 Ambulatory surgery centers (ASCs) are health care facilities that offer patients the convenience of having surgeries and procedures performed safely outside the hospital setting. This trend in healthcare is a growing new market and TekTone


 TekTone

SF523UL Pull Cord Installation
Thanks for scanning!
We’re putting the finishing touches on a full walkthrough.
We can notify you when the video is live.
But here’s a quick overview to get you started…
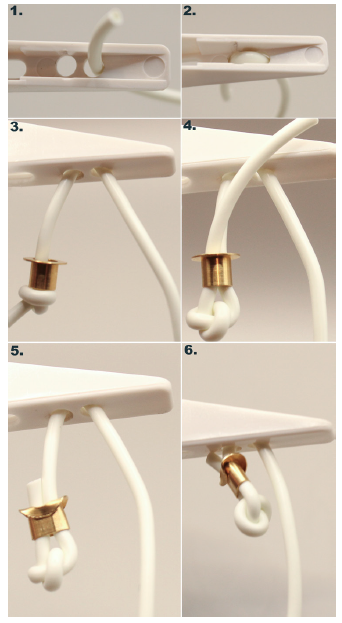
- Follow the instructions below for proper installation to ensure reliable operation of the SF523UL.
- The pull cord and triangle slider must be installed before mounting the backplate to the wall.
- First, insert the triangle slider into the back of the backplate, ensuring the ridges are facing up. Press firmly until the slider snaps securely into the backplate tracks.
- Next, thread the pull cord string up through the hole nearest the tip of the slider, then thread it back down through the center hole. The short end of the string should now extend down through the triangle slider. Slide a brass ferrule onto the short end, tie a tight overhand knot, and pass the end through the ferrule. Crimp the ferrule securely and trim any excess string. See the installation step photos included in this document for example.
- After the pull cord is installed on the slider, cut the pull cord string to the desired length. Slide the plastic pull cord handle onto the cord, followed by a brass ferrule. Once again, tie a tight overhand knot and pass the short end through the ferrule. Crimp the ferrule securely and trim any excess string.
- Once the pull cord assembly is complete, move the plastic slider to the uppermost position. This step is critical to prevent damage to the circuit board-mounted button during installation. Repeat this step any time the faceplate has been removed from the backplate, ex. battery replacement.
- After the pull cord is fully assembled, mount the backplate to the wall to continue installing the SF523UL.